GCP Integration Guide
The following guide covers the steps to integrate your Google Cloud Platform (GCP) data with Vega Cloud.
Pre-Requisites
In order to create the necessary resources to integrate with the Vega Platform you will need:
- A GCP Project, preferably within an Organization
- GCP IAM Role (
roles/owner) granted to the user performing the Integration
- GCP IAM Role (
- The Project that you are deploying to must have Billing Enabled and be linked to the same Cloud Billing Account containing data to export to BigQuery.
- To enable or modify GCP Billing Exports to the BigQuery Dataset, the user configuring the Vega Integration requires:
- To enable billing and link a project to a Billing Account the following role is required:
- Billing Account Administrator (
roles/billing.admin)
- Billing Account Administrator (
- The following GCP Role for the Cloud Billing Account to configure exports:
- Billing Account Costs Manager (
roles/billing.costsManager)
- Billing Account Costs Manager (
- BigQuery User GCP Role (
roles/bigquery.user) in the Project being used to house the Billing export
- To enable billing and link a project to a Billing Account the following role is required:
- The ability to create GCP Roles and Bind Members at the Organization or Project level depending on your needs, choose a path below
- Certain Google Cloud Service APIs need to be enabled (see below)
Deployment
Step 1: BigQuery Billing Export
First we need to determine if a Detailed usage cost BigQuery Billing export has already been enabled, as the Vega
Service Account we create later will live in the same project as the export.
- From the Google Cloud console homepage, open the Project picker from the dropdown (hotkey Ctrl+O)
- If you use a GCP Organization:
- Copy the Organization ID to a text editor from the ID column for use later in these integration steps
- Select your GCP Organization from the list of resources
- If you do not use GCP Organizations, select a Project that is linked with your billing account
- If you use a GCP Organization:
- From the left-hand navigation or the search bar, navigate to
Billing - If presented with
This project has no billing account:- Select
Link a billing account - Select the Billing account from the dropdown that you wish to integrate with Vega and then
Set account
- Select
- If presented with a Billing Table, select the
Billing account nameof the Billing account you wish to integrate with Vega - From the left-hand navigation under
Cost ManagementselectBilling export - Within the
BigQuery exporttab, underDetailed usage cost, if the export is:
Enabled
- Copy the
Project nameandDataset nameto a text editor - Click the Dataset name link to navigate to the Dataset within BigQuery
- In the Dataset info tab, find the
Data locationand copy it to your text editor
Disabled
- From the Project picker, select a Project to contain your Billing export and Vega Service Account
- From the left-hand navigation or search bar, navigate to BigQuery
- In the Explorer pane of BigQuery, click the vertical ellipses next to the Project Id and select
Create dataset- Fill in the
Dataset ID, eg.VegaDataset - For
Location typeselectMulti-regionand then select a region, eg.US
Note: Multi-region is preferred as GCP will automatically backfill current and previous months billing data if it is the first time an export has been enabled.
- Fill in the
- Select
Create dataset - Navigate to
Billing - Under
Detailed usage cost, clickEdit settings - Select the Project and then the Dataset that we just created, then
Save
Step 2: Enable Google Cloud Service APIs
The below Google Cloud Service APIs need to be enabled for the Google Cloud Project that will contain the BigQuery Billing Dataset.
You will need to enable the following Google Cloud Service APIs:
- Cloud Resource Manager API (cloudresourcemanager.googleapis.com)
- Reads and updates metadata for resource containers
- Compute Engine API (compute.googleapis.com)
- Read VMs and volumes
- Cloud Billing API (cloudbilling.googleapis.com)
- Ingest billing data programmatically
- BigQuery API (bigquery.googleapis.com)
- Ingest BigQuery data
- Recommender API (recommender.googleapis.com)
- Returns service recommendations for cost savings, security, and optimizations
- Cloud Storage API (storage.googleapis.com)
- Allows interactions with Cloud Storage Buckets
- Identity and Access Management API (iam.googleapis.com)
- Manages identity and access control for GCP resources
- Cloud Monitoring API (monitoring.googleapis.com)
- Manages your Cloud Monitoring data and configurations
First, you will need to select the Project that contains/will contain your Detailed usage cost BigQuery Billing
export
- From the Google Cloud console homepage, open the Project picker from the dropdown (hotkey Ctrl+O) and select the Project
To enable these APIs choose one of the two methods below:
Google Cloud CLI (recommended)
- Activate the Cloud Shell terminal in the top right corner of the Console (hotkey G then S)
- Verify you have the correct Project set in your Cloud Shell terminal, to the right of your gcp_user@cloudshell:
If you do not see the correct Project ID in your Cloud Shell terminal use the following command substituting in the PROJECT_ID that contains your BigQuery export:
gcp_user@cloudshell:~ (project_id)$gcloud config set project PROJECT_ID - Execute the following command to enable the necessary GCP Service APIs:
gcloud services enable cloudresourcemanager.googleapis.com compute.googleapis.com cloudbilling.googleapis.com bigquery.googleapis.com recommender.googleapis.com storage.googleapis.com iam.googleapis.com monitoring.googleapis.com
Google Cloud User Interface (web browser)
- Select the Project that contains your BigQuery Billing export
- On the Google Cloud Console home page, navigate to
APIs & Services>Library - In the API Library Search box, enter the name of the API you want to enable. Then press
Enterto execute the search - In the list that appears, click the API name to navigate to that API page. If the API is not already enabled, click
Enable - After you enable the given API, the console displays a details page for that API
- Repeat this step for each of the Service APIs listed above
- Navigate to the console Home page
- For each API you want to enable, navigate back to the home page and repeat these steps
Step 3: Create Custom Role
For the custom roles there are two separate permissions sets depending on the SKU you have with Vega.
-
vInform: This is Vega's standard offering, these permissions are used for collecting metadata and metric data on Project(s) within your Organization to enrich Recommendations within the Vega Platform.
vInform link -
vOperate: Contains the permissions necessary for Vega's Enterprise Parking solution.
vOperate link
If you are a vOperate customer, you will need to create Custom Roles for both the vInform and vOperate permission sets.
- From the GCP console, select the Project that contains your BigQuery export from the Project picker
- Activate the Cloud Shell terminal in the top right corner of the Console (hotkey G then S)
- Verify you have the correct Project set in your Cloud Shell terminal, to the right of your gcp_user@cloudshell:
gcp_user@cloudshell:~ (project_id)$
If you do not see the correct Project ID in your Cloud Shell terminal use the following command substituting in the PROJECT_ID that contains your BigQuery export:
gcloud config set project PROJECT_ID
-
Create a custom permissions file in the Cloud Shell Terminal:
Copy the contents from the vInform link:
vInform link
In the Cloud Shell terminal:nano vega-inform.yamlPressEnterCtrl+Vto paste the contents copied from the link aboveCtrl+Xto exitYto save buffer- Press
Enterto accept the current filename
-
Create the custom role:
Below there are two methods for creating the custom role, at the Organization (recommended) or at the Project. The most common integration is to create the custom role at the Organization, as this will allow the Service Account that we create to collect metric data from all Projects within your Organization from one service account.
If you are a vOperate customer, you will need to create Custom Roles for both the vInform and vOperate permission sets.
Create custom role at the Organization (recommended)
Supplement in the ORGANIZATION_ID we collected earlier and the file name used in step 4 of this Create Custom Role section, then run the following
command in your Cloud Shell terminal:
gcloud iam roles create vegaInformRole --organization=ORGANIZATION_ID --file=vega-inform.yaml
Operate only
gcloud iam roles create vegaOperateRole --organization=ORGANIZATION_ID --file=vega-operate.yaml
After successfully creating the role the last three lines of your output should resemble:
name: organizations/11234567890/roles/vegaInformRole
stage: GA
title: Vega Inform Role
Copy the contents of the name variable for use later, eg: organizations/11234567890/roles/vegaInformRole
Create custom role at the Project
Supplement in the PROJECT_ID we collected earlier and the file name used in step 4 of this Create Custom Role section, then run the following command
in your Cloud Shell terminal:
gcloud iam roles create vegaInformRole --project=PROJECT_ID --file=vega-inform.yaml
Operate only
gcloud iam roles create vegaOperateRole --project=PROJECT_ID --file=vega-operate.yaml
After successfully creating the role the last three lines of your output should resemble:
name: projects/PROJECT_ID/roles/vegaInformRole
stage: GA
title: Vega Inform Role
Copy the contents of the name variable for use later, eg: projects/PROJECT_ID/roles/vegaInformRole
Step 4: Create Service Account
The Service Account should be created in the same Project that contains your BigQuery Billing export.
- Select the Project containing your BigQuery Billing export from the Project picker
- Navigate to
IAM & Adminfrom the Navigation menu and then selectService Accounts - Select
+ Create service account - Give the Service account a name, eg:
vega-sa - Provide a description, eg:
Vega Platform Data Retrieval Account - Select
Create and continue - In the
Permissions (optional)modal from theSelect a roledropdown, find the previously created custom role
It can occasionally take some time for the newly created role to become searchable by name via the Select a role
dropdown. You can paste in the role id we copied down earlier to bypass this wait, eg:
organizations/11234567890/roles/vegaInformRole
- Select
+ Add another roleand addBigQuery Job User - Click
Continueand thenDone - Find your newly created Service Account in the
Service accountssection and copy the Email to your text editor, this will be needed in a later section. - To the right side of the Service Account row, click the vertical ellipses in the Actions column and select
Manage keys - From the
Add keydropdown selectCreate new key, selectKey typeofJSONand then clickCreate
This will automatically download the JSON key for the Service Account to your computer. This will be needed to add your Project(s) to the Provider Accounts section of the Vega Platform.
Step 5: Apply Dataset-scoped Role for BigQuery Billing Export
- Select the Project containing your BigQuery Billing export from the Project picker
- Navigate to BigQuery and drill down into the Explorer window by toggling the triangle next to the Project ID
- Select the Dataset used for the export from the Explorer window
- On the right side of the screen select
Sharing>Permissions - Select
Add principal - Under
New principals *, find the recently created Service Account (you can use the email address we copied down earlier in the search box) - Under
Assign rolesin theRole *dropdown, selectBigQuery Data Viewerand then clickSave
Step 6: Create Billing Export Bucket
- Select the Project containing your BigQuery Billing export from the Project picker
- Navigate to Buckets by entering
Bucketsinto the search bar - Click
+ Create - Give your bucket a globally unique name, we suggest using something that includes the Organization ID we copied down
earlier, eg:
vega-billing-export-123456789012
Copy the bucket name to your text editor as you will need to provide this to Vega for billing data ingestion.
- Under
Location typeselect the same region as the BigQuery Billing export Dataset fromStep 1, eg:Multi-region:US - Click
Create - View the
Bucket detailsby clicking the hyperlink of the Bucket name - Select the
Permissionstab and then+ Grant access - Under
New principals *, select the Service Account we created earlier - Under
Assign rolesin theSelect a role *dropdown, selectStorage Object Userand then clickSave
Vega recommends setting a lifecycle rule on the bucket to minimize storage costs.
(Optional) Create Lifecycle rule
- Still within the Bucket details from the previous step, select the
Lifecycletab - Click
Add a rule - Under
Select an actionselectDelete objectand then clickContinue - Under
Select object conditions>Set Conditions, check the box forAge - Set your desired number of days and then click
Create
You can set the age to as little as 1 day, Vega recommends 7 days
Step 7: Add Role Binding(s)
Depending on your Vega SKU (vInform/vOperate), you will need to create one or more role bindings. Depending on where the role was created, you'll need to use a different command for the role binding.
If you are a vOperate client with multiple Projects in your GCP Organization and would like to only deploy these permissions to a subset of Projects, use the Project-scoped role binding on each Project you would like to utilize Vega's Enterprise Parking solution with. If you would like vOperate permissions on all Projects within your GCP Organization, use the Organization-scoped role binding.
Organization binding | vInform
If the Inform role you created was at the Organization:
With the Project containing the vega-sa Service Account selected, run the following command supplementing in
ORGANIZATION_ID, SA_EMAIL and CUSTOM_ROLE(this is the console output from the role we created previously)
gcloud organizations add-iam-policy-binding ORGANIZATION_ID --member='serviceAccount:SA_EMAIL' --role='CUSTOM_ROLE' --condition=None
Your constructed command should resemble:
gcloud organizations add-iam-policy-binding 11234567890 --member='serviceAccount:vega-sa@gcp-project-id.iam.gserviceaccount.com' --role='organizations/11234567890/roles/vegaInformRole' --condition=None
Project binding | vInform
If the Inform role you created was at the Project:
With the Project containing the vega-sa Service Account selected, run the following command supplementing in
PROJECT_ID, SA_EMAIL and CUSTOM_ROLE(this is the console output from the role we created previously)
gcloud projects add-iam-policy-binding PROJECT_ID --member='serviceAccount:SA_EMAIL' --role='CUSTOM_ROLE' --condition=None
Your constructed command should resemble:
gcloud projects add-iam-policy-binding gcp-project-id --member='serviceAccount:vega-sa@gcp-project-id.iam.gserviceaccount.com' --condition=None
Step 8: Provide Integration Details to Vega
In order to configure the BigQuery Billing export for ingestion into the Vega platform there are a few items you'll need to provide to your Vega Customer Success Manager or Onboarding Engineer:
- The
Project Idwhere the Service Account was created- If your BigQuery Dataset is located in a different Project than the Service Account, Vega will need that
Project Idas well.
- If your BigQuery Dataset is located in a different Project than the Service Account, Vega will need that
- The BigQuery Billing export
Dataset Id - The BigQuery Billing export
Table Id - The
Bucket Namecreated in Step 6
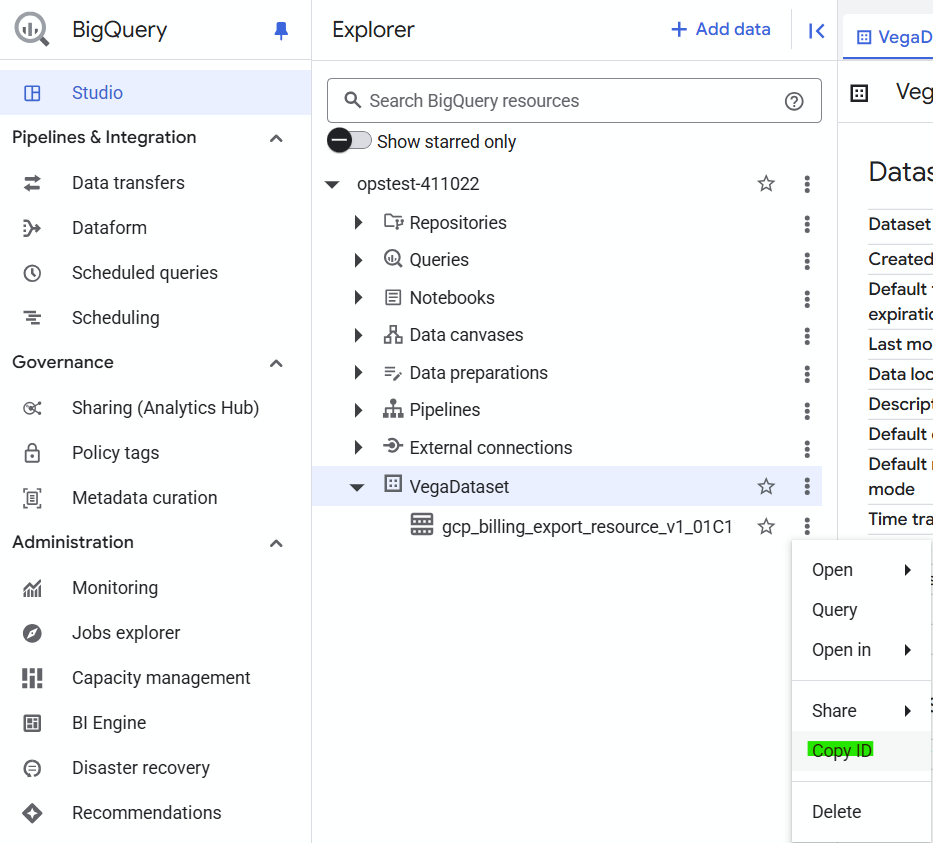
You can acquire the Project Id, Dataset Id and Table Id by clicking the three-dot ellipses next to the table name in the BigQuery Explorer and selecting 'Copy ID'
If you do not yet have access to the Vega Platform you will need to provide Vega with the JSON key file associated with the Service Account via encrypted email. Other options for secure file transfer are available, please reach out to your Vega Customer Success Manager.
Adding GCP Projects to the Vega Platform
Use the process below to add your Google Cloud Projects to the Vega Platform. Provider Accounts will use the Service
Account named vega-sa that was created in Step 4.
- Go to Settings and Add a Provider Account (Select Google Cloud Platform.)
- Enter your GCP information in the dialog:
- Paste the service account JSON into the Service Account field.
- (Optional) Enter a Vega Account Alias, a friendly name for the account.
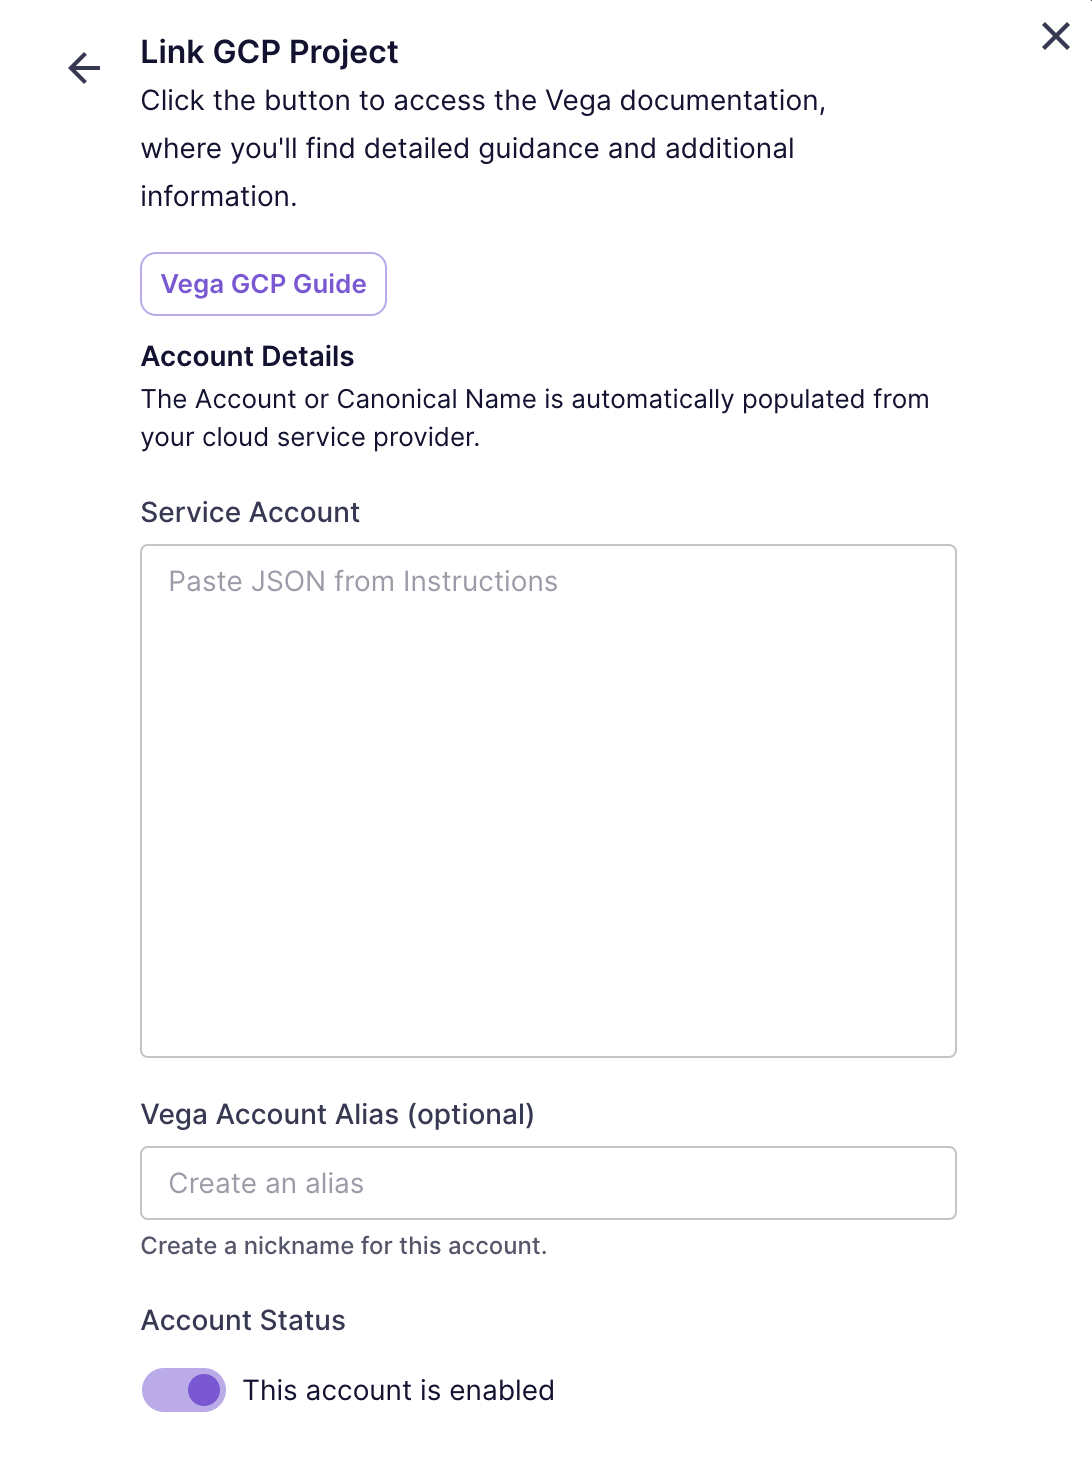
If you aren't ready for your accounts to be ingested by Vega yet, you can toggle the 'Enabled' switch to 'Disabled' to prevent data ingestion.
- Click
Link Accountto link the account and start the discovery process.
If you have multiple projects, repeat the above steps for each project or alternatively use the Bulk Upload feature to add multiple projects at once.